Tuesday, May 17, 2011

Front and Middle Battery Rack Installation

May 17, 2011 - I've been quite the busy bee since posting last weekend. I have been able to accomplish the following tasks:

1 - Re-install the fresh air blower and control boxes
2 - Install the Front Battery Rack and Box
3 - Install the Middle Battery Rack and Box

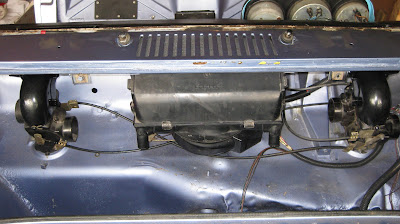
Re-installing the fresh air blower and control boxes was a major PITA. Thanks to the kind contributors at 914world.com, I was able to figure out how to re-cable it all back together and actually make it work with the climate control assembly in the dash. Here's a pic of it all back together, minus of course, the hoses that I have yet to order that connect the blower to the control boxes and the control boxes to the dash vents. I can actually push the blower lever to the three positions and feel the air come out of the blower at the correct settings.


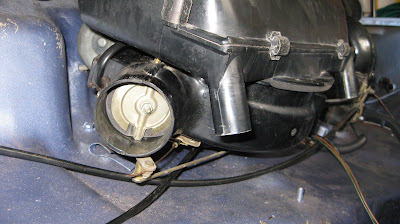
Here is a pic of the passenger side control box with the control cables correctly hooked up.


Driver's side control box:


And fresh air blower showing one of the exhaust vents with the new seal:


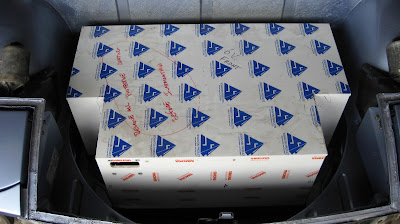
Now, onto the more interesting stuff. Here's the front trunk prior to battery rack install:


And a shot of the battery rack installed. Just need to drill four holes in the rear and four in the front. The rear used two bars with two bolts welded to each pushed up from the bottom and attached to the rack using nylock nuts. ElectroAutomotive only provided one bar in the kit they sent me and thus I had to fabricate the second one. The front used 1/4" bolts and nylock nuts to hold down the tabs of the rack.


And, of course, a gratutious shot of the front battery box installed.


Moving on to the middle battery rack. Here's a pic of the driver side rack mount. What's interesting here is that the rack mount uses the two top bolts of the stabilizer arm to attach to.


And a pic of the passenger side rack mount which also uses the two top bolts of the stabilizer arm to attach to.


And of course, ElectroAutomotive also failed to send me the two pieces of 1-1/2" x 29" angle iron cross beams. I only ordered three things from EA, 1) battery rack/box kit, 2) motor adaptor, and 3) motor mount. Not only did I not get a detailed itemized list so I could not check what I didn't get (very sneaky of them) but I failed to receive the exhaust kit which is included in the kit. Now, bare in mind I don't need it, but I paid for it and never got it. I did complain in e-mails and letters to no avail. Also, the motor mount was also incorrectly drilled for mounting to my Warp9 which I blogged about previously. Here's a pic of the entire middel rack assembly installed:


Another gratuitious shot of the middle battery box installed:


And yet another but showing both front and middle battery boxes installed:


Stay tuned for more exciting developments as we get closer to getting this EV on the road and experiencing the "grin".

Sunday, May 8, 2011

Rear Battery Rack Installation

May 8, 2011 - Another week has come and gone and forward progress continues. This week I successfully completed the following tasks:

1 - Restored the fresh air blower box
2 - Installed the windshield wiper
3 - Installed the Rear Battery Box

Since I was getting close to putting in the battery racks and boxes, I decided it was time to button up the front firewall area and reinstall the windshield wiper and fresh air box. Firstly, I had to refurbish the fresh air blower box. I ordered the fresh air blower seal kit from 914rubber.com for about $18. It contained seals for the blower, blower valves, and blower box to cowl. Here's a pic of the fresh air blower box with the blower seal installed:


Here's one of the refursbished blower valves:


Here's a shot of the top of the blower box with the new seal, this mates with bottom of the fresh air cowl:


And here's a shot of the screen wrapped in screen material ready to installed:


I can't install the fresh air blower until the windshield wiper is installed and then reinstall the climate control assembly. When I took out the windshield wiper, I didn't know about the rack mount in the back and broke it. Even though the rack mount is NLA, I was able to find a suitable replacement from Aircraft Spruce for about $6.


Unfortunately, the new rack mount is 5/16" but the old one was 6mm, so I had to take apart the windshield wiper assembly and grind off the old nut that was brazed to the assembly. I took a shot of the assembly to remember hwo it went back together.


I was then able to reinstall the windshield wiper assembly with new rack mount:


Next up, tackling the rear battery rack mount. What a major PITA that was. Once I was able to get the rack mount properly fitted, I was able to drill the holes for the mount plates. Here's a shot of the passenger compartment mount plates installed:


Had to cut and grind a slot into the top of the controller heat sink to allow the rack to set correctly on the passenger side:


The driver side mounting plate was a little more difficult to negotiate:


Here's a passenger side shot of the rack properly installed and ready to take the battery box:


And a driver side shot of the rack installed:


And finally a shot of one side of the battery box installed with five batteries:


Sunday, May 1, 2011

Engine Compartment Cabling and Motor-Transaxle Mounting

May 1, 2011 - I took off Friday so I'd have a three day weekend to work on the car and got quite a good bit accomplished as a result. To start with, I finished the low-voltage wiring and the high-voltage cabling completed to a point where I could mount the motor/transaxle. To finish up, with a little help from neighbor Tony, we were able to mount the Motor/Transaxle firmly to the body.

What was exciting is that cabling the engine compartment indicates that I am not far from the end. I can begin to see the light at the end of the tunnel so to speak. I started with the emergency breaker and cabled from it to the contactor and rear positive terminal block. And then from the contactor to the controller positive battery terminal. I got to use my new Juli YYQ-120A hydraulic crimper that I ordered from EVWorks in Australia for about $80 but with shipping via boat it came to around $135. I think Harbor Freight has its little brother for about $50 but I wanted something a little bit stouter. My first two attempts failed until I realized that the die they indicated to use for 2/0 cables was way to big for my connectors. So I used the next size die down which is for #1 cable and got really nice crimps. Here's the a shot of the crimping tool:


Here's a shot of the contactor cabled:


It may seem intuitive or obvious to some but you only put the terminal connectors on one end of each cable. Install the cable into the vehicle and then mark the top of the cable at the unterminated end. Then take the cable out and crimp on the connector so that the top of the connector lines up with your mark on the cable. This is so that you won't have to twist the cable unnaturally and put undue torsion stress on any connection point. And a shot of the emergency breaker cabled:


And a shot of the rear positive terminal block cabled. A cable from the front pack will connect to this terminal block as well.


And then a shot of it all:


So here's the motor/transaxle getting ready to go in. I forgot to attach the engine cross-member to the motor-mount before I took the pic.


It took a little bit of wrangling but thanks to the tranmission scissor jack and regular jack, Tony and I were able to raise the motor/transaxle up high enough to firstly attach the transaxle to it's mounts.


Once the transaxle mount points were slightly tightened, we were able to raise the motor end so that the cross-member end-points touched the mounts points. We slipped the 3/8" bolts into the mount points and cross-member end-points and snugged them up.


The rest of these shots are of the motor sitting pretty in the engine compartment. Here's a shot from the left side of the car:


And a shot from the top of the car looking down into the engine compartment facing rearward:


And finally a shot from the right side of the car:


There are so many things to do next I won't begin to list them here but think about what next to attack during the upcoming week. Until then, Caio!