Saturday, April 10, 2010

Priming with Rust Encapsulator

April 9, 2010 - Finally the weather has warmed up and the live oaks have just about quit spewing their pollen granules. I was able to tape up the car last weekend and attempted to start priming the car with Eastwood's Rust Encapsulator. The Rust Encapsulator is a great product and puts down a great coat but I don't think the creators intended for it to be used in a spray gun even though they do sell spray cans.

My first attempt at using thinned down Rust encapsulator ended in frustration as it just kept stopping up the gun. I used lacquer thinner like they suggested but it would just not spray. I eventually had to buy paint strainers and strain it extremely well before the gun would spray it. But once well-strained, it sprayed on like a champ. I have no doubt that the paint will lay down and adhere nicely to the coat of Rust Encapsulator. I intended to spray on two coats but I went thru 1 & 1/2 quart cans mixing up and straining enough for one good coat.

I should add that last Sunday after getting frustrated with the spray gun stopping up, I went to manual mode and used a 1" brush to paint the outer firewall in the hell hole. So when I figured out the straining trick, the hell hole got a second sprayed-on coat.

I'll paint the interior with the same blue paint as the exterior. I only have about 1/5 of the original gallon left. If I run out before I'm finished, I'll have to buy more. I'm pretty sure this paint is not cheap. For the hell hole/transaxle area, I'm going to use Eastwood's Rubberized Undercoating in spray cans. I used the undercoating after repairing the rust in the the passenger side front wheel well and it turned out extremely well.

Here's the car after taping it up:


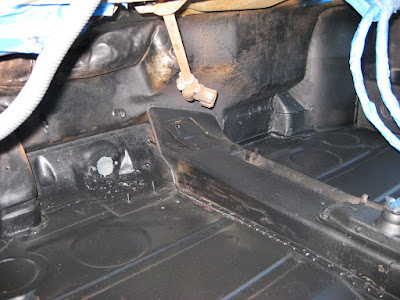
Hell hole view from rear looking up forward after being primed:


Hell hole view, firewall closeup:


Hell hole view, left side:


Hell hole view, right side:


Transaxle compartment view, looking up from ground:


Interior view, driver side; passenger side not primed yet:


Interior view, driver side footwell:


Interior view, seat back firewall; passenger side not primed yet:


Interior view, driver seat well:


Interior view, driver side seatback; passenger side not primed yet:


Interior view, driver side seat well:


Interior view, driver side foot well:


Interior view, driver side footwell closeup:


Interior view, passenger side primed:


Interior view, passenger side seat back view:


Interior view, passenger side foot well:


Interior view, fully primed:


Interior view, both foot wells primed:

Sunday, March 21, 2010

Emergency Brake Cable Tube Installation

March 21, 2010 - It's been almost 4 months since my last blog entry. The weather here in Tampa, FL has been way too cold for us thin-blooded FL dwellers to do any serious work outside. However, the first day of Spring was quite warm ~80F and allowed me to continue making forward progress.

I had to fabricate new emergency brake cable tubes. The right tube held the biggest challenge as it was required about a 60 degeree bend while the left tube was about a 4" straight section. I used 1/2" electrical conduit to make the new tubes.

Below is the the left inner firewall piece from AutoAtlanta which I previously welded into place. As you can see, my welding is not great but the tack welds should be sufficient to hold them in place.


Here are a couple more pics of the inner firewall tubes.


Here's a shot of the outer firewall showing both tubes.


Here's a closeup shot of the left inner firewall tube:


Here's a closeup of the right inner firewall tube. You can see I also had to fabricate a standoff from the firewall to anchor the tube.


I hope to finish metal filling all of the little holes and such with All-Metal Filler from Eastwood that abound in the doorsills, floorboards, and outer firewall this week in preparation for priming both interior and hell-hole/tranny area with Eastwood's Rust Encapsulator this coming weekend given the weather co-operates.

If weather co-operates and the primer is applied, the following weekend will be spent painting the interior with the leftover body paint. I'll use Eastwood's Rubberized Undercoating to paint the hell-hole/tranny area.

Sunday, November 8, 2009

Mobile Sawhorses and Continuing Interior Prep

November 8, 2009 - It's been 3 weeks since my last blog entry and forward progress continues to be made. I decided that I need to be able to move the car in and out of the garage onto the driveway to give me more elbow room and sunlight. I just can't say enough about having direct sunlight to work by.

So the mobile sawhorses came about when a neighbor commented on how I should put castors or wheels on the bottom of the jackstands. The castors sort of defeat the purspose of the jackstand but the concept was workable. So I put pencil to paper and came up with the following: sawhorses using 300lb brackets and 360-wheels capable of supporting 250lbs.

Since the overall weight of the frame at this point is between 600-700 lbs, the sawhorses should be plenty strong enough. One person can easily albeit slowly move the vehicle in or out of the garage. After moving the vehicle in and out of the garage a few times, I have to say, the sawhorses are really the "bee's knees"; I'd only wish I'd thought of it sooner. Here's a side view:


Here's a front-on view:


And a three-quarter view:


As you can see, the construction is really quite simple. The sawhorse brackets were purchased from Ace Hardware for about $5/pair. They are screwed into the 2x4s with 1-1/2 in wood screws. The 360-wheels came from Harbor Freight and cost about $30. Yes, half of the wheels are lockable. I used almost 8 2x4s at $2/piece from Lowes and the hardware to bolt the wheels to the lower 2x4s ran about $15. The entire cost of both assemblies was about $75. While the sawhorses are more than strong enough for the task, I have to be leary of the sawhorses moving and constantly checking of their position. And finally, a three-quarter view of the entire vehicle and sawhorses:


Now back to the interior prep. I think I'm 90% finished with the interior. I've stripped all of the paint, tar, seam sealer, etc down to bare metal. Here's what's left to do:
  • Fill in all of the small rust holes with All-Metal Filler.
  • Weld the parking brake pivot into place.
  • Weld the left inner firewall piece into place.
  • Thoroughly clean entire surface area.
  • Prime with Rust Encapsulator.
  • Paint.
The center console tunnel was a real pain in the a**. It was covered with floor pan tar and had to be air-hammer chiseled out. Here's a forward three-quarter view from the driver's side:


Here's a forward three-quarter view from the passeneger's side:


Here's a three-quarter view of the rear firewall from the driver's side:


Here's a shot of the upper rear firewall driver's side:


And finally a shot of both rear firewall and driver's seat area:


As you can see in the immediate above picture, the bottom right hand corner had some serious rust issues. It is black because it has been "rust converted" and "rust encapsulated". I will prime the entire interior with Rust Encapsulator as I believe it will be the best rust inhibitor for the rest of the car's life.

Saturday, October 17, 2009

Designing a Digital Dashboard using RideRunner

October 2009 - I have been spending a considerable amount of time engineering a new digital dash solution for my 914 EV. While analog gauges are readily available, I believe that an EV should be a show piece and take advantage of the latest technologies including carputers and touch screen video displays.

Here is a shot of a standard 914 center console with clock, temperature and voltage gauges. While these gauges are OK for an ICE vehicle, they will not suffice for an EV.


An EV needs the following instrumentation: pack voltage, utility voltage, motor current, and state of charge. These four meters are available in 2 1/2" meters from ElectroAuto for about $250. They would probably fit in a new console board with the gauges staggared diagonally but wouldn't give it that new technology look.

Obviously, a carputer will be necessary to implement my digitial dash solution and is not the topic for discussion at this time but in a later blog. Here is a shot of the MIT EVTeam's solution for a center console video display. I suspect my solution will be similar.


As you can see above, the bezel is too large for my liking. I will be using a Lilliput 7" Touchscreen display as shown below. While it is 7" diagonally, the width is 6" and will only cause the existing console to be widened minimally. I will also be using Microsoft's Windows Embedded technology as the carputer's operating system due to its very fast boot-time (15 secs) and its ability to be very secure. I estimate the OS' footprint at about 400MB including all of the executables for the front end, music player, digital dash interface, etc. Funny, all of my MP3s at ~20GB will dwarf the OS image.


I looked at a number of front ends for the carputer including RideRunner (formerly RoadRunner) and Centrafuse. I finally decided on RideRunner as it is currently free and has wide support from mp3car.com forums. Here's a shot of the RideRunner main menu screen with the Simplistique skin shown. As you can see, I've already altered the menu skin to incorporate my new dash component.


Here's a shot of the Music screen. I plan to have all of my mp3s on the carputer's 60GB hard drive (a Seagate ruggedized version) and a randomized playlist.


And here's the money shot of my digital dash. It includes a pack voltage meter, a utility voltage meter, a motor current meter, and a state of charge meter. The SOC meter is an interesting animal because you can implement it in one of 3 different ways: 1) voltage-based - least accurate, 2) specific-gravity-based - most accurate but unfeasable, and 3) direct-measurement - counting amp-hours. I decided to use direct measurement. As I will already be sampling the motor current, it will be simple to track the amp-hours used and count down from a known full charge level (resetting the meter after charging). The meters shown here are based on the "AGauge" .NET control currently available as open-source.


I'm putting a lot of effort into the digital dash as I really don't want to murder my first lead acid battery pack, a cost of anywhere from $1.2K - $2K. If you know your pack voltage, how many amps you are pulling from it, and how much power you have left in it, then almost anyone can keep from killing a pack unless you just totally ignore it. I'm hoping that my first SLA pack will be my last; I should be able to replace it with a Li-Ion pack for about $3K in about 3 years. And that should double or triple my range.

Here's a nice shot of another neat application available with RideRunner. Its a weather module using the Weather Channel's information available for any city, in this case Tampa, FL. Using the carputer's wireless network adaptor, I'll be able to access it while still in the garage.


Of course, many of you out there are wondering how I've engineered the interface. I discovered Fusion Control Centre's Fusion Brain; its a wonderful device that allows digital inputs and outputs. Fusion Control Centre offers a number of sensors that interface directly with the Fusion Brain. Here's a shot of the Fusion Brain version 4 which I'm using; it runs about $60. It's literally the size of a credit card. BTW, the fusion brain connects to the carputer via a USB cable which also supplies power to the device.


I'm also using one of Fusion Control Centre's 4-Channel Opto Isolator and Voltage Divider boards to take the pack and utility voltages and convert them into 0-5 volt signals for the Fusion Brain. I really like the board because it is relatively inexpensive compared to the Fusion Brain and it optically isolates the input voltages from the output voltages, so if any of the input voltages spike, they won't take out the Fusion Brain. The opto isolator board sells for about $18. It also has places on the board to mount addtional resistors if you have a voltage other than 7V or 15V which are their defaults. In the case of the 120V input, I'll need to add a 5K resistor.


As the feed for the motor current gauge is taken from the 500 amp shunt built into the EVHelp 144 volt dc controller, its 0-50mV output will need to be amplified about 100X by an op-amp circuit board. This is a relatively simple circuit that is easily "googled" and breadboarded. The 100X amplification should give me a nice 5-volt signal for direct feed to the Fusion Brain. Here is a logical connection diagram for all of the components thus far discussed.

Prepping the interior

October 17, 2009 - It's been over 4 months since my last blog but I have not been idle. I've decided to strip the interior down to the metal and then prime and paint.

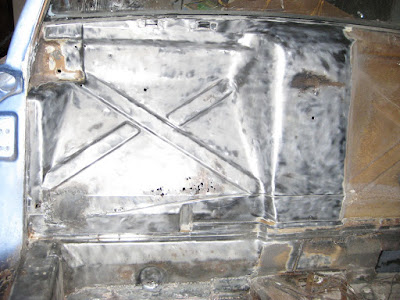
Here's the right inner firewall behind the passenger seat that's been thoroughly grinded with a wire-brush attachment. You can see a bunch of rust holes that were under the seam sealer. I will use All-Metal filler on these instead of welding in small sheet metal patches.


Here's the right floor pan under the seat area that's been prepped using a grinder and steel wire-brush wheel. I have yet to use paint thinner and thoroughly clean as that will be the last step after all the paint has been removed and prior to painting.


Here's the right floor pan leg area. You can still see that the foot area has not been completely prepped yet. You can also see the rust repair work I had to perform. It was rusted all the way through to the gas tank compartment. Good grief!


OK, those were all after shots. Here are some before shots of the left side. Here's the left inner firewall behind the driver's seat. As you can see, it has not been prepped yet. You can also see some of the rust repair work that I had to perform. If you'll look at the bottom of the firewall, you'll see two small holes for the new parking brake cable conduits that I have to weld in but not until I finish prepping the interior and weld the lower inner firewall piece in place. See below.


Here's a shot of the lower inner firewall piece from AutoAtlanta.


Here's the left floor pan seat area unprepped. Kind of nasty, eh? I removed the lower inner firewall piece for the shot.


Here's the left floor pan leg area including the restored pedal assembly that I was test fitting.


Here's a three-quarter view of the left floor pan area unprepped in contrast to the prepped right floor pan.


And finally, here's a shot of the right door sill I welded back in place on Monday over the recently installed clamshell. I also did the left side but it was too close to the garage wall to get a decent picture of it. I didn't want to spend $16.50 on the sill triangles (2) for a total of $33, so I fabricated my own using one of the old one's' as a template. My boss let me use his plasma cutter. Boy, those things are awesome. Thanks Adam!!!


I should be finishing the interior prep job within the next few days. I'll probably post some more shots showing the entire interior as prepped. I'll then wheel the "teener" outside to degrease and pressure wash the hell hole/transmission area before I prime and paint the interior and hell hole/transmission area.
Since I'm going to be moving the vehicle in and out of the garage onto the driveway numerous times, I'm going to build some special sawhorses on casters and then move the frame onto those. The frame can't weigh anymore than 600-800 pounds at this time. I've already taken the trailing arms off and reconditioned them. Need to take some pictures of those too and post. Later.