Sunday, May 31, 2009

Right Longitude Clam Shell Prep

May 31, 2009 - It's been 3 months since my last post but I haven't been idle. I have finally killed and encapsulated the rust on the inside of the longs. Wheww!!! What a job that was. I had to remove the door sills (what a chore too!!). I drilled about 6 holes in each long evenly spaced; if you look hard enough you can see them. Through these holes and the rusted metal holes I cut away front and over each jack mount, I used a spray bottle with wand and sprayed Eastwood's Rust Converter inside. I then used a compressed air blower and blew air into the drip openeings in the bottom of the longs to coat the entire inside of each long. After two coats of the Rust Converter and a week, I then repeated the operation but with Eastwood's Rust Encapsulator and waited another week for it all to dry.

I then welded two pieces of sheet metal, one over the front long hole and one over the jack mount as I won't be using it due to not having enough room to carry a spare. I painted the both sides of the sheet metal pieces with Rust Encapsulator as well to keep them from rusting.


Finally, I fit the clam shell over the long. This was very time consuming and took about 2-3 weeks but as you will see it fits very tight. I currently have it mounted with Vise-grips in anticipation of welding it in. I drilled holes every 4 inces along the top and bottom seams for spot welds. I'll probably drill additional weld spot holes along the middle of the clam shell for strength.

I should have both completed by next weekend but only time and the next blog will tell.


Sunday, February 15, 2009

Inside Left Inner Firewall

February 15, 2009, Cut out the rightmost portion of the left inner firewall to see what kind of rust damage was caused by a presumed leaky window. As you can see, major rust damage to emergency brake cable tubes as they come in from the outer firewall and where the left heat exchanger tube comes in from the firewall into the long.

Had an experienced 914 buddy come over and look at the longs. They are apparently in good shape. I will remediate the rust on the inner longs with Eastwood's Rust Converter and Encapsultor using a sprayer with wand. I will then add the frame stiffeners which overlay the longs from AutoAtlanta.


Above is the frame stiffener from AutoAtlanta.

Below is where its resides in the frame.

Wednesday, December 17, 2008

Front end suspension removal

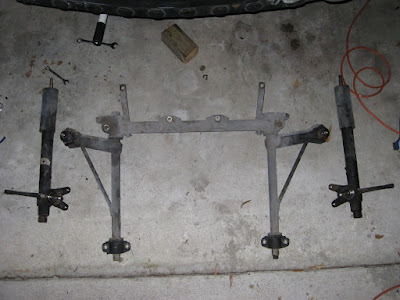
December 7, 2008, Spent about 5 hours dropping the entire front end suspension: brake calipers, rotors, struts, control arms w/ torsion bars, auxillary carrier, and tie-rods.

Thursday, November 27, 2008

Right Outer Rocker Panel Removal

November 23, 2008, Removed the right outer rocker panel and to my dismay found some major rust deterioration at the jack mount and the most forward area. I also found some rust in the right front wheel well. Additional grinding under the forward forewall revealed rust deterioration left of the master cylinder.


Saturday, November 22, 2008

Brake Master Cylinder Removal

November 16, 2008, Removing the master cylinder took about two hours to remove due to the rusty condition of the brake line connectors. There were three connectors: one from each front wheel and a single line from the rear wheels. The master cylinder (shown) is very rusted and will need to be replaced.


Friday, November 21, 2008

Pedal Assembly Removal

November 9, 2008, Took a couple of hours to remove the pedal board and then the pedal assembly. Thirty years of gunk built up on the pedal assembly along with some rust. Will definitely have to rebuild with new brass bushings, brake and clutch springs, and pedal pads. Will have to perform some rust remediation on the interior pedal assembly area as well as the exterior master cylinder area as shown in the photos. The pictures shown here were taken after the master cylinder was removed on November 16th.


Seats, console, and fuel line removal

November 5-6, 2008, Took an hour or so to remove the seats and console. Lots of reading and finally an hour to remove the fuel lines, pulling from the engine compartment underneath the car.