Here's the right inner firewall behind the passenger seat that's been thoroughly grinded with a wire-brush attachment. You can see a bunch of rust holes that were under the seam sealer. I will use All-Metal filler on these instead of welding in small sheet metal patches.
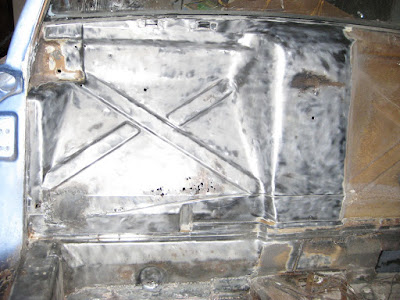
Here's the right floor pan under the seat area that's been prepped using a grinder and steel wire-brush wheel. I have yet to use paint thinner and thoroughly clean as that will be the last step after all the paint has been removed and prior to painting.

Here's the right floor pan leg area. You can still see that the foot area has not been completely prepped yet. You can also see the rust repair work I had to perform. It was rusted all the way through to the gas tank compartment. Good grief!

OK, those were all after shots. Here are some before shots of the left side. Here's the left inner firewall behind the driver's seat. As you can see, it has not been prepped yet. You can also see some of the rust repair work that I had to perform. If you'll look at the bottom of the firewall, you'll see two small holes for the new parking brake cable conduits that I have to weld in but not until I finish prepping the interior and weld the lower inner firewall piece in place. See below.

Here's a shot of the lower inner firewall piece from AutoAtlanta.

Here's the left floor pan seat area unprepped. Kind of nasty, eh? I removed the lower inner firewall piece for the shot.

Here's the left floor pan leg area including the restored pedal assembly that I was test fitting.

Here's a three-quarter view of the left floor pan area unprepped in contrast to the prepped right floor pan.

And finally, here's a shot of the right door sill I welded back in place on Monday over the recently installed clamshell. I also did the left side but it was too close to the garage wall to get a decent picture of it. I didn't want to spend $16.50 on the sill triangles (2) for a total of $33, so I fabricated my own using one of the old one's' as a template. My boss let me use his plasma cutter. Boy, those things are awesome. Thanks Adam!!!

I should be finishing the interior prep job within the next few days. I'll probably post some more shots showing the entire interior as prepped. I'll then wheel the "teener" outside to degrease and pressure wash the hell hole/transmission area before I prime and paint the interior and hell hole/transmission area.
Since I'm going to be moving the vehicle in and out of the garage onto the driveway numerous times, I'm going to build some special sawhorses on casters and then move the frame onto those. The frame can't weigh anymore than 600-800 pounds at this time. I've already taken the trailing arms off and reconditioned them. Need to take some pictures of those too and post. Later.

No comments:
Post a Comment